Pages

Monday, October 31, 2011

Happy Halloween 2011

Every year we bring the kids to my grandparents house for pictures with the pumpkins my grandfather carves... a very important Halloween tradition! This morning was no exception...

Ryleigh as a cupcake with Joe Pumpkin and Braeden as a dinosaur with Daisy Pumpkin...
Grandad fixing Braeden's sleeve...
Granny and Braeden...
Ryleigh and Grandad...
I combined Tot School and K4 for our Halloween Party... we played games, did a craft, listened to a story...and did lots of playing...
Braeden listening intently to the Halloween Story...
Miss Lily...aka...Jack Jack Incredible....
We made Ghost Handprints.... A great keepsake...
My little cupcake getting her hand painted...
Braeden did really well making his ghosts...
Cinderella...
In line for Monster Bowling....
We played Pin the Eye on the Pumpkin...
in lieu of blindfolds they were supposed to keep their eyes closed...

Braeden pinning on the eye... I don't think his eyes were closed...
Our finished Ghosts....
Neighbors and Some of our Friends....
After a Brief Costume Change (Ryleigh likes to try and wear a different costume every couple of events!) ... we are ready for Trick or Treating!!!
HAPPY HALLOWEEN!!!

Wednesday, October 26, 2011

Whatcha Making Wednesdays .... Chocolate Chunk Cookies...

Welcome to Whatcha Making Wednesdays...This week my K4 class made Nestle Tollhouse Chocolate Chunk cookies... (Yummy!)... the ingredients and directions are located on the back of the chocolate chunk package... I have also listed them below....

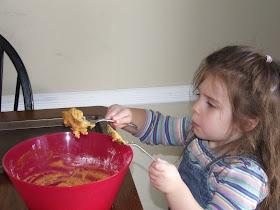
Adding some flour to the mixture...

Putting in some chocolate chunks...
The finished cookies...


Ingredients

  • 2 1/4 cups all-purpose flour
  • 1 teaspoon baking soda
  • 1 teaspoon salt
  • 1 cup (2 sticks) butter or margarine
  • 3/4 cup granulated sugar
  • 3/4 cup packed brown sugar
  • 1 teaspoon vanilla extract
  • 2 large eggs
  • 1 3/4 cups (11.5-oz. pkg.) NESTLÉ® TOLL HOUSE® Semi-Sweet Chocolate Chunks
  • 1 cup chopped nuts

Directions

PREHEAT oven to 375º F.

COMBINE flour, baking soda and salt in small bowl. Beat butter, granulated sugar, brown sugar and vanilla extract in large mixer bowl until creamy. Add eggs, one at a time, beating well after each addition. Gradually beat in flour mixture. Stir in chunks and nuts. Drop by rounded tablespoon onto ungreased baking sheets.

BAKE for 9 to 11 minutes or until golden brown. Cool on baking sheets for 2 minutes; remove to wire racks to cool completely.

PAN COOKIE VARIATION:
GREASE
15 x 10-inch jelly-roll pan. Prepare dough as above. Spread into prepared pan. Bake for 20 to 25 minutes or until golden brown. Cool in pan on wire rack. Makes 4 dozen bars.

FOR HIGH ALTITUDE BAKING (3,500 to 6,000 feet): Increase flour to 2 1/2 cups. Add teaspoons water with the flour; reduce both granulated sugar and brown sugar to 2/3 cup each. Bake drop cookies for 8 to 10 minutes and pan cookie for 17 to 19 minutes.

If you have a baking/cooking (etc.) activity that you have done with children and would like to share... please link up!!!! We are always looking for fun...and yummy recipes. If you do link up...please try and visit someone else's entry and share some comment love...

For a Reminder of the Guidelines to Link Up...Please visit here


Wednesday, October 19, 2011

Whatcha Making Wednesday .... Pudding Cones...


Welcome back....to whatcha making Wednesday.... This week we made Pudding Cones... I'm sure this has been done... but I was trying to figure out what to have my Tot School Class make for their very first cooking project...that would not be too stressful... and instantly thought of pudding in a bag...so easy!!! Sometimes we put the pudding in a graham cracker crust... but...I somehow thought this may be messy/ or hard to eat for the 2 year olds... so... my Husband said... "Why not put them in ice cream cones?"... They came out so cute!!...

Pouring the milk in the bag.... Age 2... some assistance may be needed ;-)The older kids (age 4) are able to complete this activity on their own...
Squishing the pudding and the milk... this was the favorite part...
The Finished Pudding Cone... YUMMY!!!!

What you will need:
1 Package of Instant Pudding (we used chocolate)
1 1/4 Cup Milk (This is less than what is directed on the package)
Redi Whip/ Whip Cream (optional)
Ice Cream Cone
Zip Lock Bag

Directions:
Put the pudding and the milk in the bag...squish it around until semi firm... cut hole in zip lock bag...smoosh pudding right into ice cream cones (should make about 4 cones with one regular sized package).... top with whip cream/redi whip


If you have a baking/cooking (etc.) activity that you have done with children and would like to share... please link up!!!! We are always looking for fun...and yummy recipes. If you do link up...please try and visit someone else's entry and share some comment love...

For a Reminder of the Guidelines to Link Up...Please visit here


Monday, October 17, 2011

Colors...Warthog Style...

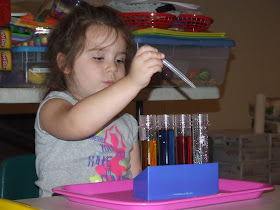
This week we read Warthog's Paint...A messy Color Book.... we love this book for so many reasons... but it is great for demonstrating Primary Colors...and Mixing them to Make Green, Orange and Purple... Also... Braeden likes to recite it..Usually we do a "stART" project each week... (A story +Art= a great stART!)... but this week...we did a few things...a science project, an art project and some fine motor skill/play... I had the girls in the older class do a science experiment...and mix colored water (the younger kids watched me do this experiment)...we then did some watercolor painting...and some play/building with colorful pegs...
Green...
We used the pipettes... which is great for fine motor practice...and also...ups the experiment feel to this project...
The girls loved this project... they concentrated and took their time mixing the colors...
Purple...
Painting...with watercolors....
After listening to the story and talking about the colors of the rainbow... the kids were very focused on their projects...
Super excited to keep painting...
Building with the colorful pegs and pegboards...
Admiring his friends' work...
How tall can you make them?

For more great stART posts check out A Mommy's Adventures!
For more fun science projects go check out Adventures in Mommydom.....
To see what others did this week check out Tot School at 1+1+1=1; Preschool Corner at Homeschool Creations; Mom 2 lil Posh Divas and the Weekly Wrap-up at Weird Unsocialized Homeschoolers.
For more fun projects check out ABC and 123... Red Ted Art ...Adventures in Mommy Land and JDaniel4's Mom

Thursday, October 13, 2011

stART - Marble Painting....with Garbled Marbles...

One of the books we read this week was Care Bears The Great Big Pumpkin... they dressed up for Halloween... very cute...Our project this week was Marble Painting... pretty much the only tie in between the book and project... pumpkins are round...as are the marbles... also.. the carebears are very colorful...like the paint.. too much of a stretch? :-)

For a science project we did Garbled Marbles...
and I didn't want to waste them so we used them for painting...
I put s
ome different colors of paint on everyone's paper...
and the girls picked 5 marbles from their experiment to use for the project...
Ryleigh picked 5 pink...
FYI... because these are not "real" marbles.. they tended to stick in the paint a bit more...
Rolling the Garbled Marbles in the paint....
Almost done...
2 of the finished pictures...
For more great stART posts check out A Mommy's Adventures!
For more fun projects check out ABC and 123... Red Ted Art ...Adventures in Mommy Land and JDaniel4's Mom

Wednesday, October 12, 2011

Whatcha Making Wednesdays .... Iced Pumpkin Cookies....aka... YUMMY!


Welcome back to Whatcha Making Wednesdays!!!! This week my K4 class made some Pumpkin Cookies... that we frosted/glazed/iced... such a yummy fall treat!!!

Stirring the Cookie Batter...
Rounding
the cookies by Tablespoons.....
Frosting the cookies...
YUMMY!!!
The finished Iced Pumpkin Cookies...

What you Need....
  • 2 1/2 cups all-purpose flour
  • 1 teaspoon baking powder
  • 1 teaspoon baking soda
  • 1 1/2teaspoons ground cinnamon
  • 1 1/2 teaspoons pumpkin pie spice
  • 1/2 teaspoon salt
  • 1/2 cup butter, softened
  • 1 1/2 cups white sugar
  • 1 cup canned pumpkin puree
  • 1 egg
  • 1 teaspoon vanilla extract
  • 2 cups confectioners' sugar
  • 3 tablespoons milk
  • 1 tablespoon melted butter
  • 1 teaspoon vanilla extract
  1. Preheat oven to 350 degrees F (175 degrees C). Combine flour, baking powder, baking soda, cinnamon, pumpkin pie spice and salt; set aside.
  2. In a medium bowl, cream together the 1/2 cup of butter and white sugar. Add pumpkin, egg, and 1 teaspoon vanilla to butter mixture, and beat until creamy. Mix in dry ingredients. Drop on cookie sheet by tablespoonfuls; flatten slightly.
  3. Bake for 15 to 20 minutes in the preheated oven. Cool cookies, then drizzle glaze with fork.

  1. To Make Glaze: Combine confectioners' sugar, milk, 1 tablespoon melted butter, and 1 teaspoon vanilla. Add milk as needed, to achieve drizzling consistency.

If you have a baking/cooking (etc.) activity that you have done with children and would like to share... please link up!!!! We are always looking for fun...and yummy recipes. If you do link up...please try and visit someone else's entry and share some comment love...

For a Reminder of the Guidelines to Link Up...Please visit here